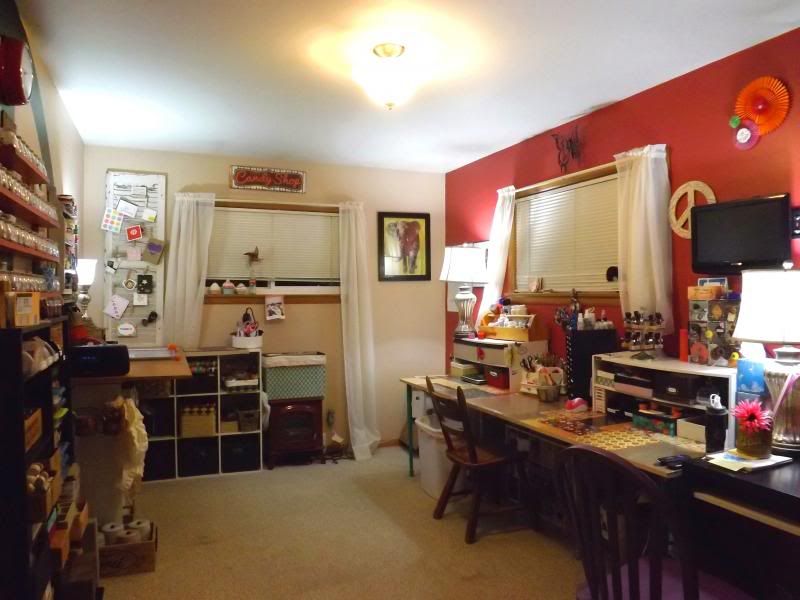
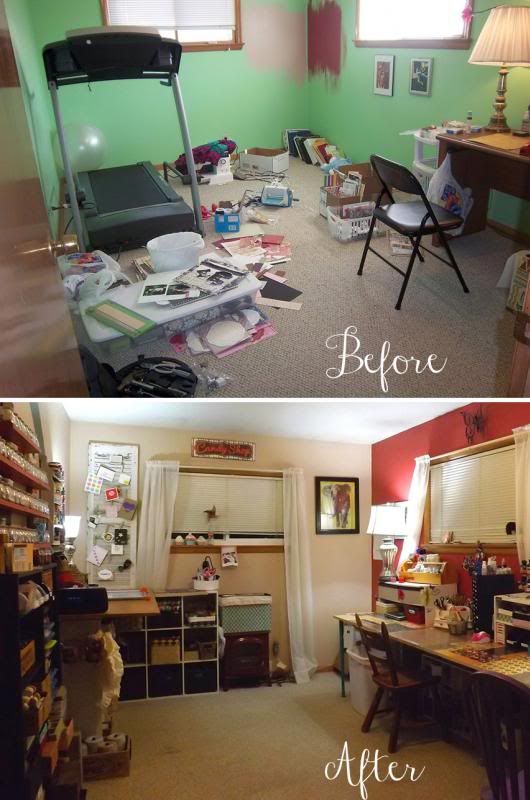
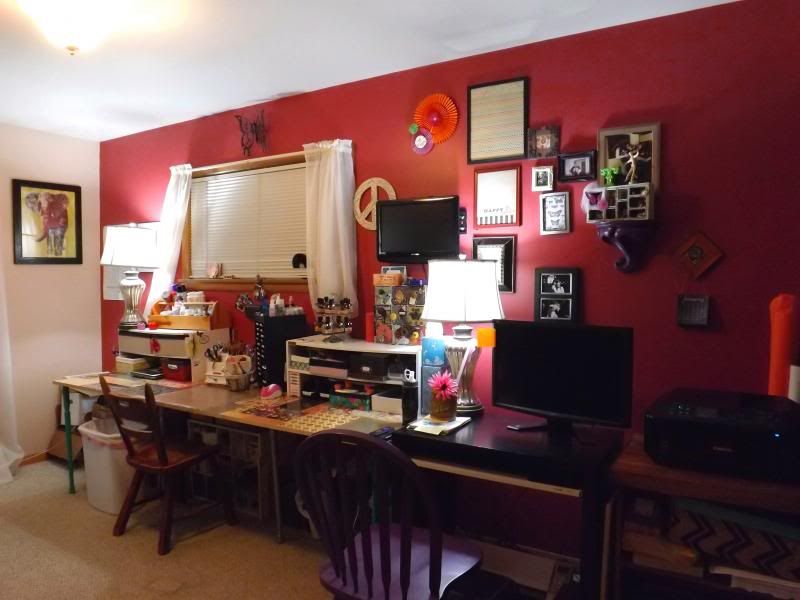
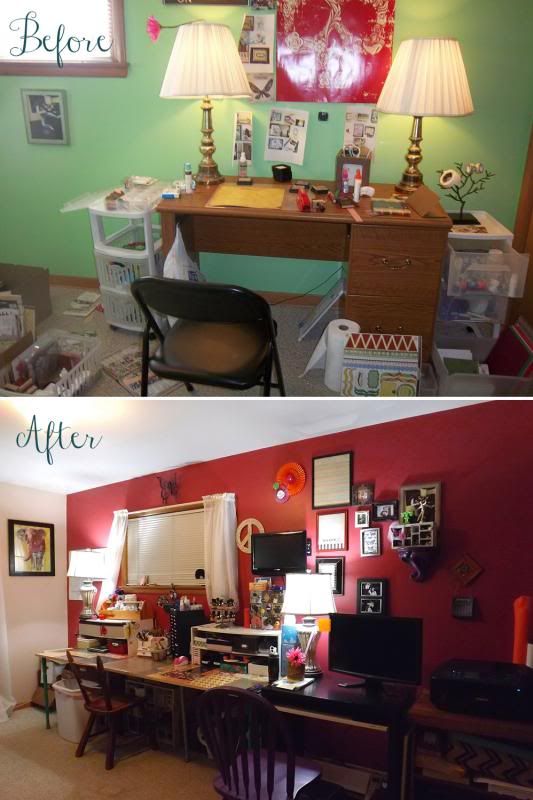
Now, I'm going to talk about the entire room because I love it.
And what I love, I love to share. And sharing is caring! If you don't care,
then *I* don't care. Just peruse the pictures and I'll be none the wiser. Maybe leave me a comment and tell me if you like it and if something inspired you.
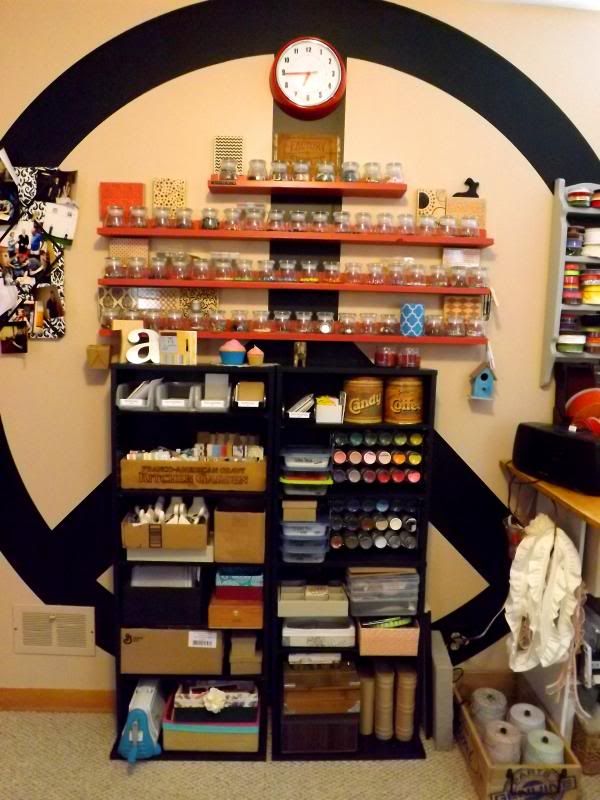
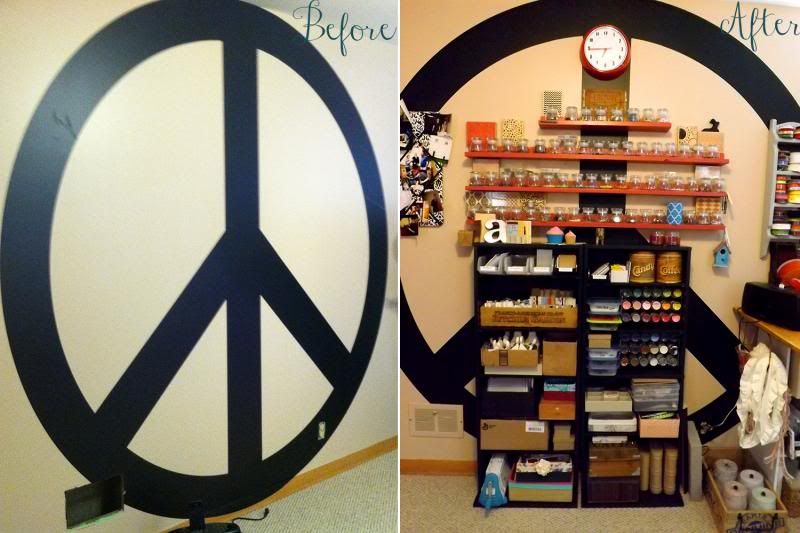
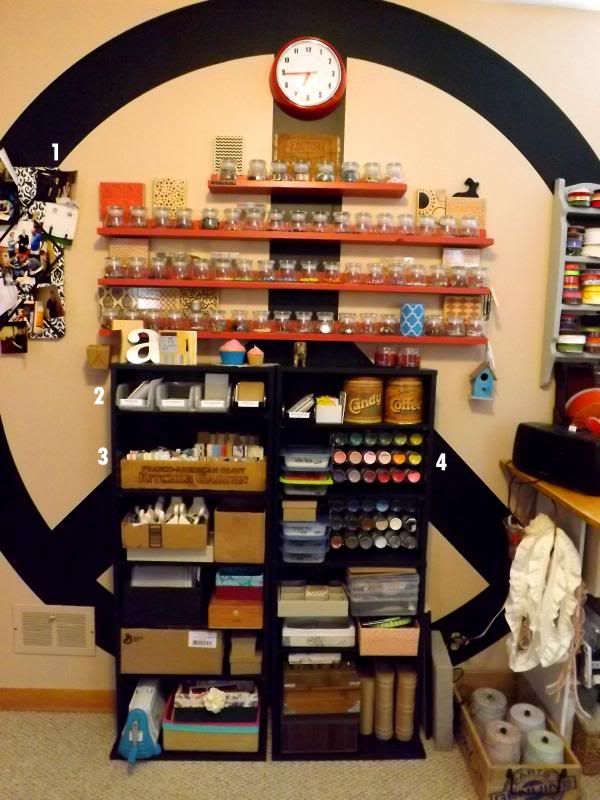
I purchased these black media shelves recently from Walmart for $15 each. I had been looking for a bookshelf with really shallow shelves, but couldn't even find a regular bookshelf that would fit in the area (I thought) I wanted them in. These fit perfectly in the corner and were perfect for my needs. This weekend we moved them from the corner to under the shelves, but they’re perfect there, too. They fit just under the lowest shelf and they don’t protrude out and in the way. A happy accident!
The red railings up above are made from scrap wood from Menards, which were $2 per board (8 boards total), and I used leftover paint from the opposite wall. Total project cost: $10. They store miscellaneous small things: brads, eyelets, loose gems, safety pins, and just about every Tim Holtz trinket there is (I may have a crush on Tim). Not only do I love them because they’re functional, cute, have adorable containers on them, contain a million and two things I like, but I love them specifically because they were $10. Talk about a steal!
Read more about them here.
THE WORKSTATION:
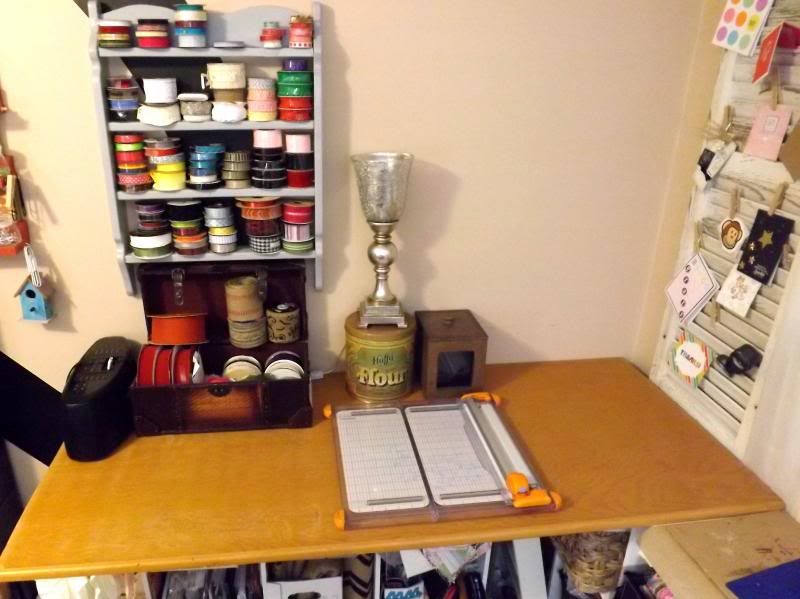 |
| The workstation. |
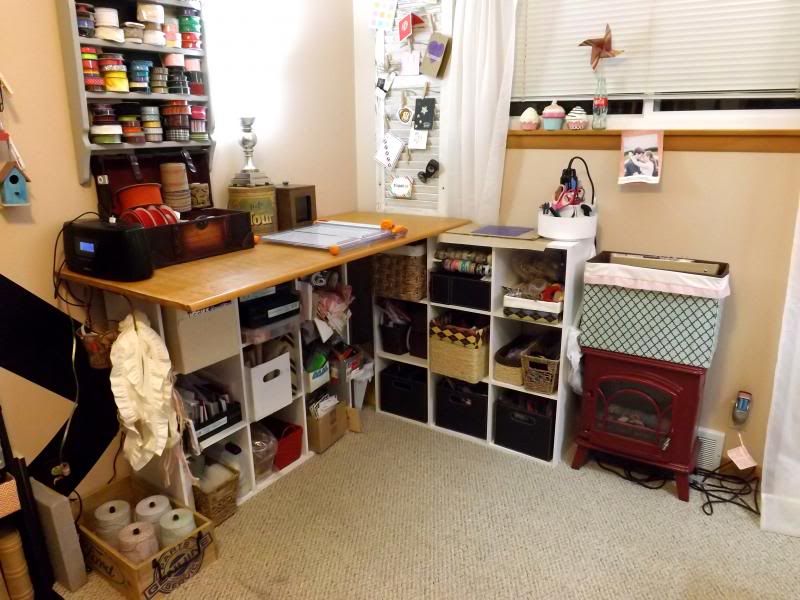
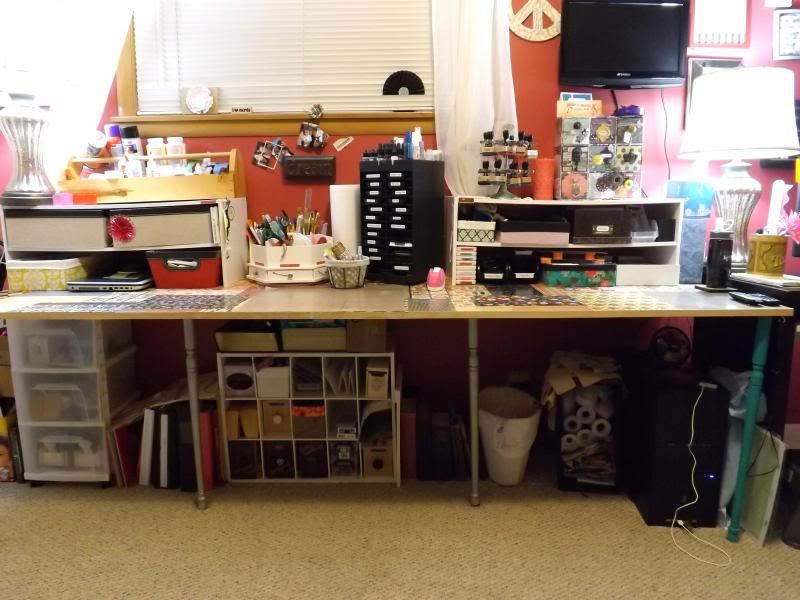
The workstation is a makeshift table made from two
storage cubes from Walmart and a piece of wood that used to be the only shelf in the closet. Read on to hear a little more.
This workstation is tall enough that it hits above my waist, so I don't have to bend over while cutting, using the Cuttlebug, laminating, or whatever else I need to do here.
Lisa had the idea to swing the workstation 90 degrees to
make the room much more open. I love it. There is no wasted space, as the area
in the corner holds a few items that need to be stowed and out of sight, like a garbage can.
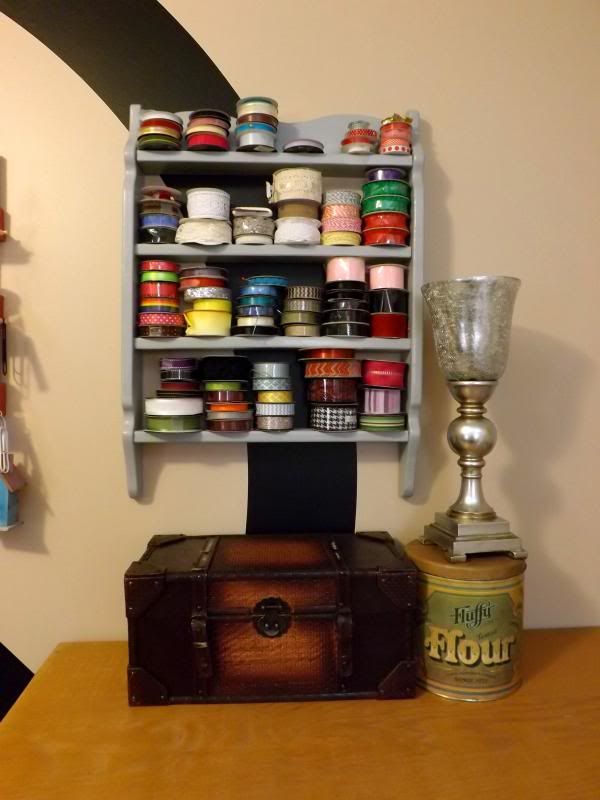 |
| Ribbon storage area. |
I have way. too. much. ribbon. The shelf was purchased at a thrift store and spray painted. The chest box was ~80% off at Hobby Lobby.
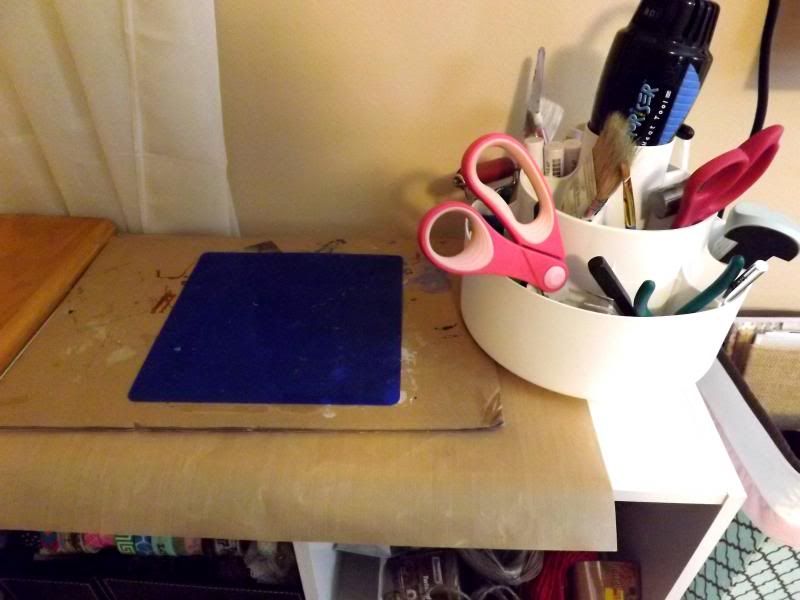 |
| Heating area. |
I have an area to the right of the workstation table that may not look pretty, but is functional and works for me. There's a non-stick craft sheet (always useful), a piece of cardboard (that I like to use for heat embossing), and a silicone mat (for hot gluing). Next to those is a container thing (I call it my non-moving Lazy Susan) that I inherited from a friend. It's nice to have an extra set of regularly used tools nearby (scissors, pencil, pen, tweezers, craft knife, ruler, etc), even if they're dull or otherwise not as nice as the main items I use.
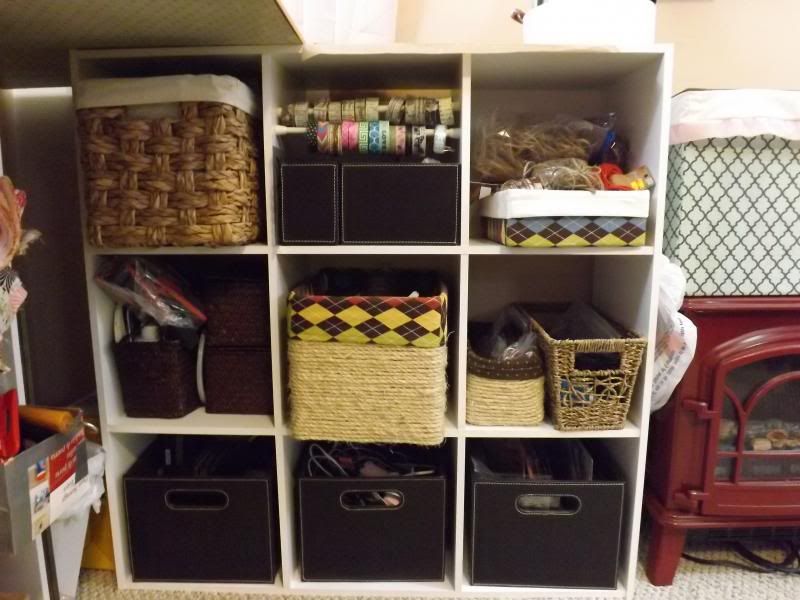 |
| Under the workstation - one way. |
These bins are filled with things like stamps, raffia and other strings, washi tapes, fabric flowers, acrylic paints, dies, and the top left bin holds my finished cards, organized by type of sentiment.
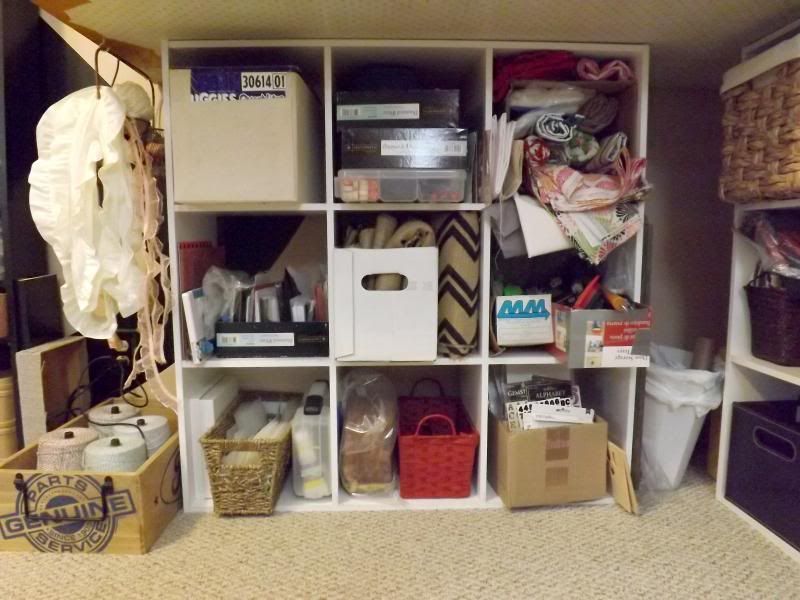 |
| Under the workstation - the other way. |
This side holds embossing folders, alphanumeric stickers, fabric, trinkets/spare parts that won't fit on the red railings on the peace sign wall, envelopes, a box of screws and nails, along with a box of other small tools like a screwdriver set, hammer, needle nose pliers, etc.
The boxes of hand tools is handier than you might think! Not only useful in my craft room, but it’s a great place for us to store simple tools on the first floor of the house, rather than having to go down to the basement every time we need a screwdriver.
THE TABLE STATION:
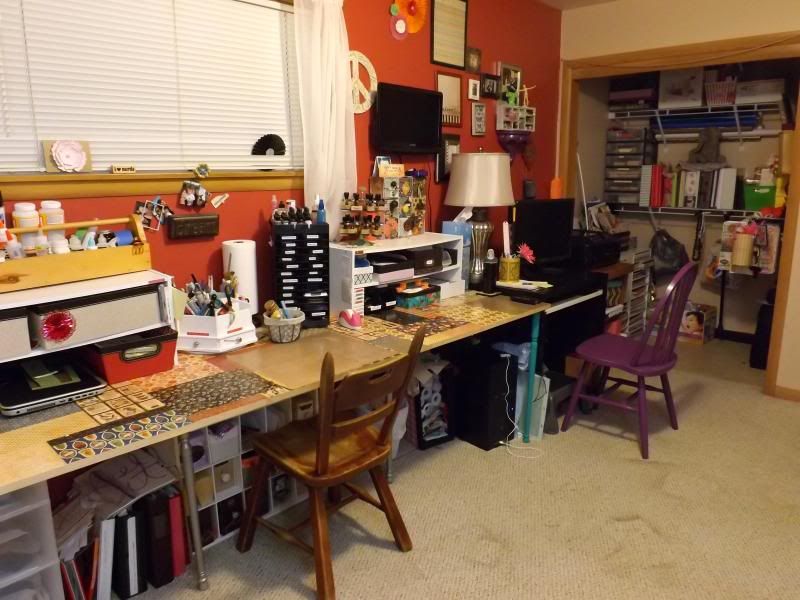 |
| View from the back of the room. |
When Adam and I first moved into our home, we got a gift
card for Shopko from his grandmother. We had no other use for anything at
Shopko, so we got a computer desk and I started working off of that. You can see that in the "before" picture above. Working
off of such a tiny space was awful. I remember utilizing the majority of the
floor just to function, which you can also see in the "before" picture above.
When I finally talked Adam into creating this spare room
specifically into a craft room, I told him the first thing I wanted was a
frikkin huge desk with a ton of space, and I wanted it deep so that I could put
organizational pieces on top. These two pictures were my main inspiration:
DawnMcVey and
Ana White via MACTANYA.
Dawn McVey’s table was deep, deep, deep. She was able to put
so much storage on top of the desk to have the main items she always uses right
at her fingertips. I loved that. I wanted
that.
MACTANYA’s project that’s posted on Ana White’s site is
really what gave me the case of the envies. LOOK at all that desk space! If I
had to choose between the deep or the long, I’d choose the long in a heartbeat.
Luckily I was able to get the best of both worlds. I went to
Lowes and got a slab of 1” x something x something slab of wood. LOL. I don’t
have any idea what the size was, because we got it cut down to what I wanted:
1” high, 30” deep, and 96” (8 feet) long. There were two employees helping us
cut the wood, and they both thought I was crazy… of course they thought it was
way too long and way too deep. I told them I knew what I wanted and I went on
my way.
Read more about it here.
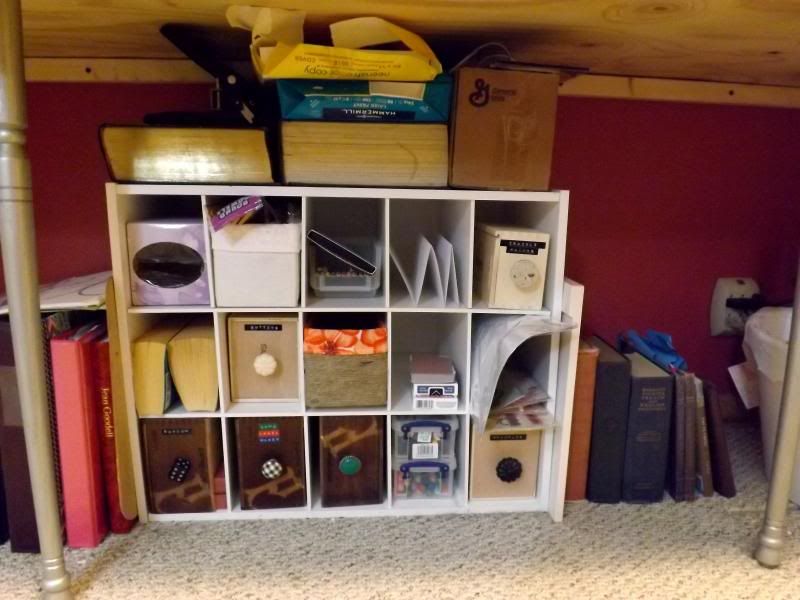 |
| (This is the best shot I have of the underside of the table) |
As you can see, we used a piece of wood, approximately 1.5”
x 1.25”, to "anchor" the desk to the wall. The guys at Lowes said that would give
it the stability it needed. WRONG! It didn’t feel stable at all - especially not
for what I was going to be using it for! I went back and got four table legs,
painted them, and screwed them in. It may not be the best construction there ever was, and of course
there are i27d64 different ways to do it correctly, but this baby has held up
nice and strong for the last three years! (knock on wood).
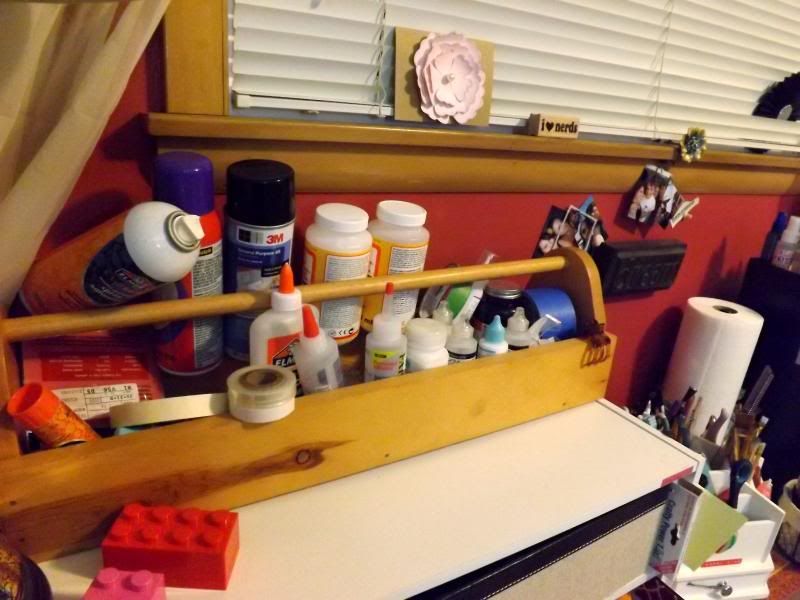 |
| Left side - on top of shoe organizer. |
To the left of my work area, I have an awesome tool box that
I got at a garage sale for $2 which stashes my adhesives.
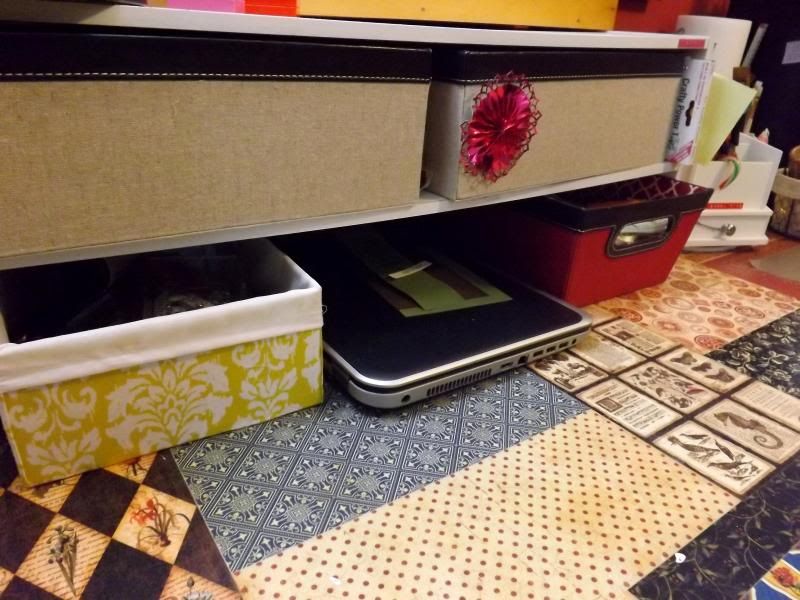 |
| Left side - under shoe organizer. |
The two coordinating boxes at the top of this image are each split into 9 units inside, all 18 of which are filled with random junk that I don’t use often. The yellow box holds regular household items which I find extremely useful: items like a red Swingline stapler, lint roller, command hooks, my glasses (which I never wear), etc. I use my laptop sometimes when I want to craft and look at something directly in front of me to copy off of. The red bin is full of pads of paper and sticky notes.
 |
| Main work area. |
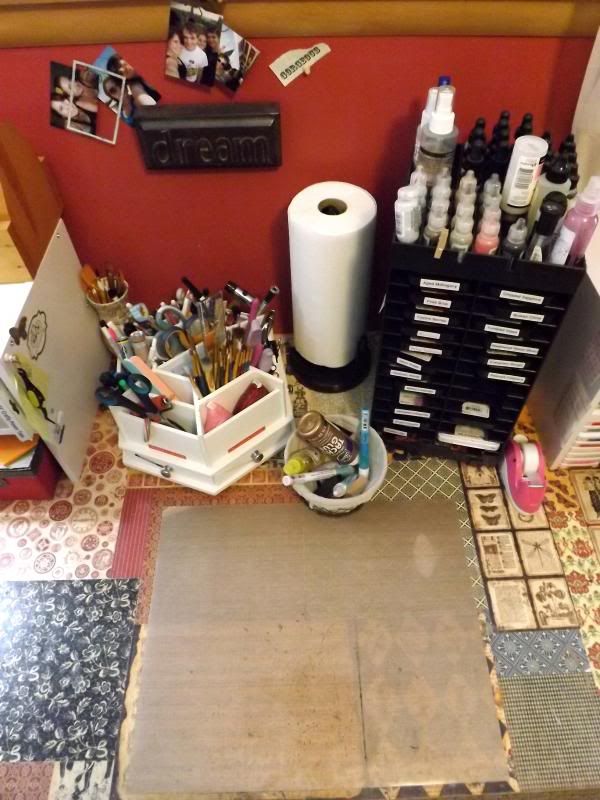
I love my main work area. It is so perfect for me. I love
looking up to seeing some of my favorite photos, some of my recent cards that I have in the window sill (not pictured), and
every important tool that I need for any kind of project in my (off-brand) Lazy Susan.
 |
| Right side - on top of the shoe organizer. |
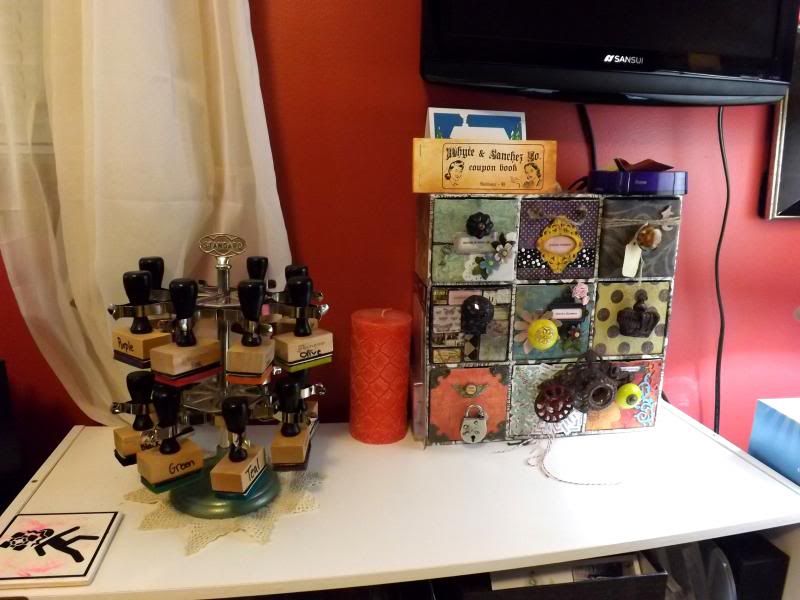
To the right of my work area, I have my beloved Ranger
blending tools, along with a 9-box container that I altered. I think the plain box came from Oriental Trading. Of course, like
me, no one box matches the other. The paper all came from the same paper pack, but that's about the only thing I meant to be in common between them. I love all of the different knobs!
 |
| Right side - under the shoe organizer. |
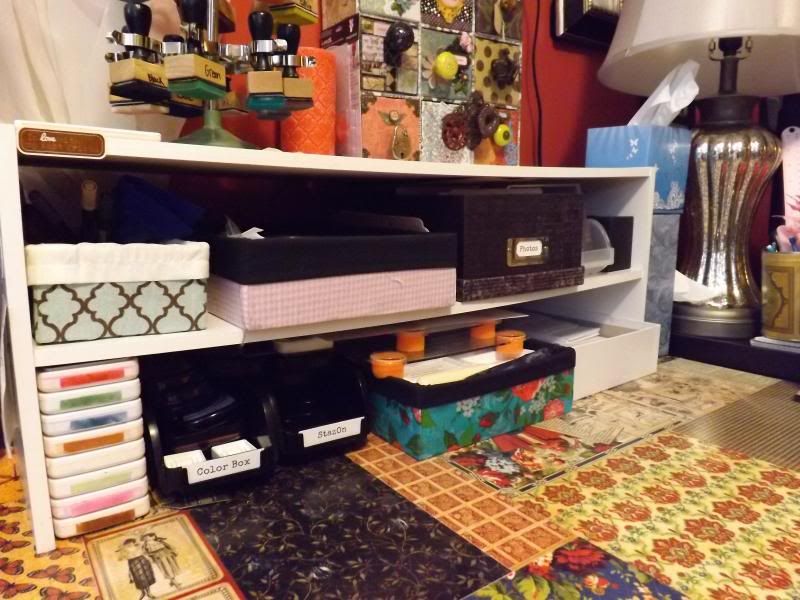
This is basically the stamping corner. I have like 982 ink pads behind all of this which I inherited from a friend that are all dried up and I’m too lazy to buy reinkers for. The pink box contains projects that I've thrown to the side due to me not being inspired enough. I do that a lot...
The inspiration for these white organizers can be found here. When it's warmer outside, the plan is to nail pallet wood on the backside of these so that they're more stable. I've had them for a few years and you can see they're bowed. I don't know if it'll work, but I have pallet wood for free, so there's no harm in trying, right?
UNDERNEATH THE TABLE STATION:
 |
| Under the table storage. |
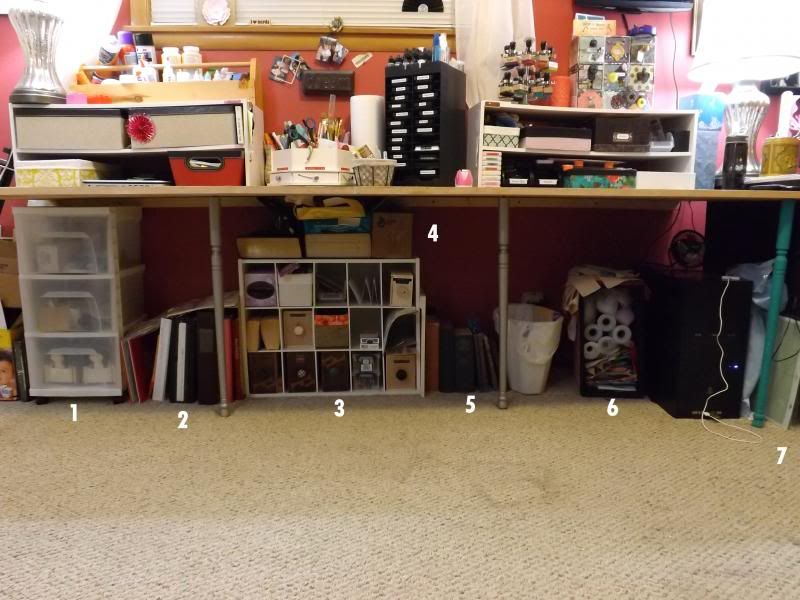
- You know what that thing is. It’s a crappy
plastic drawer for organizing, and it always comes off-track when anything is
put in it. Anything. This one has held up pretty well, probably because I know they suck
and I don’t really use it except for storage itself... I don't go into the drawers often. This weekend I tried changing up the contents, so we'll see how well it holds up now. The bottom shelf has some Martha Stewart punches,
then the others store my backup stash of various tapes, sandpaper, cutting
blades, ink blending foams, etc.
- To the right of the drawers are binders that I call my
“reference books”, which have things like some inspirational photos, templates,
and a binder index of some of my stamps so I don't have to go searching for the perfect stamp. I can just look under the category and compare the images. The stamps are then assigned a number and stored. This is still a work in progress... it takes a long time!! Lastly I have a smashy-type of binder that I use for random things that I really want to "smash". I like to have my K & Company Smash Books themed, or at least a little more planned out than just gluing on a comic strip that I find humorous.
- I have a 15 unit organizer, normally used for holding shoes,
which was gifted to me by my awesome brother in law! This holds things like colored pencils and markers, stencils, Tim Holtz Crackle Paints,
dictionaries that get ripped up for art projects, buttons, tiny gift boxes, cards leftover from my 52 Reasons ILove You deck of cards for my mother, bling/sparkles/diamond thingers, and my Dymo Label Maker (LOVE that thing!!).
- On top of the organizer, I have a large dictionary and a
“world book” which is like an encyclopedia, a heavy duty 3 hole punch, a ream of Neenah cardstock, (80 lb), smooth copy paper, and a
box with cords (headphones, ipod chargers, blank CDs etc).
- To the right of the organizer, I have various dictionaries, books for inspiration (Tim Holtz' and Tao Te Ching), and my Kindle.
- To the right of that is a box of tulle spools and scrap
fabrics. The idea is to make a quilt when I have enough scraps.
- My computer is to the right of that, and in between my
computer tower and computer desk is where I keep my Silhouette mats.
COMPUTER WORKSTATION:
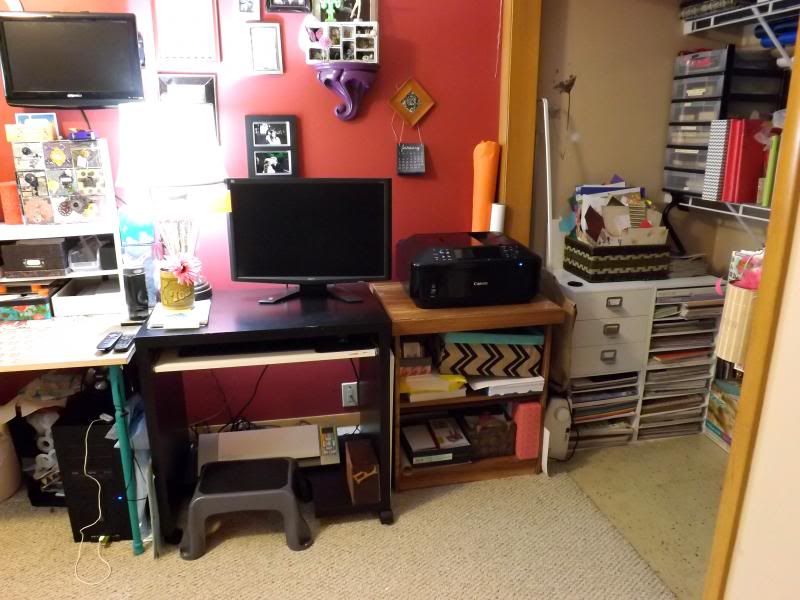 |
The Computer Workstation
|
My computer desk is perfect and I’ve had it for years. It was a floor
model from Ikea so it was like 60-75% off the sticker price. It holds just what
I mainly need: my huge monitor, a lamp, and my Silhouette in a convenient and
compact place. You can see the Silhouette on the bottom, right behind the foot
stool. I love that my Silhouette is somewhere that I don't have to move it to use
it. Yes, it's annoying bending down to use it, and yes, I've bumped my head a
few times against the bottom of my desk, but it works, really! I like having it
out of the way enough that I don’t run into problems wishing that there were a
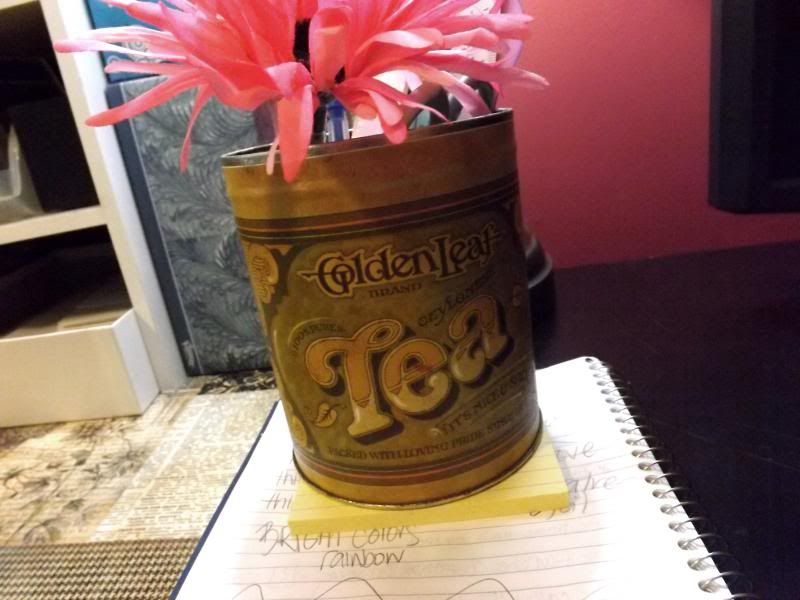
better place for it. Also, I love my antique tea tin can. Like at my workstation,
it's super handy to have a small bundle of tools handy. I use my ruler, notepad
and sticky notes every single day.
The unit that my printer is on is called a microwave table,
whatever that means. Adam’s mother gave it to us when Adam and I moved in
together. We put the huge (52” or so) TV on top of it. It looked ridiculous!
Now it just holds some cardstock, copy paper, photo paper, labels, a Silhouette
Vinyl Starter Kit, and my itty bitty sewing bin. You can tell I
don’t sew very much!
THE CLOSET STATION:
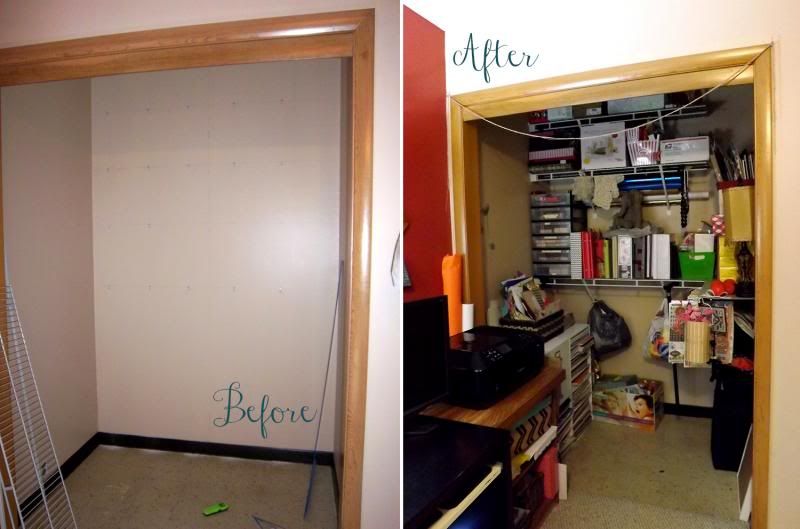
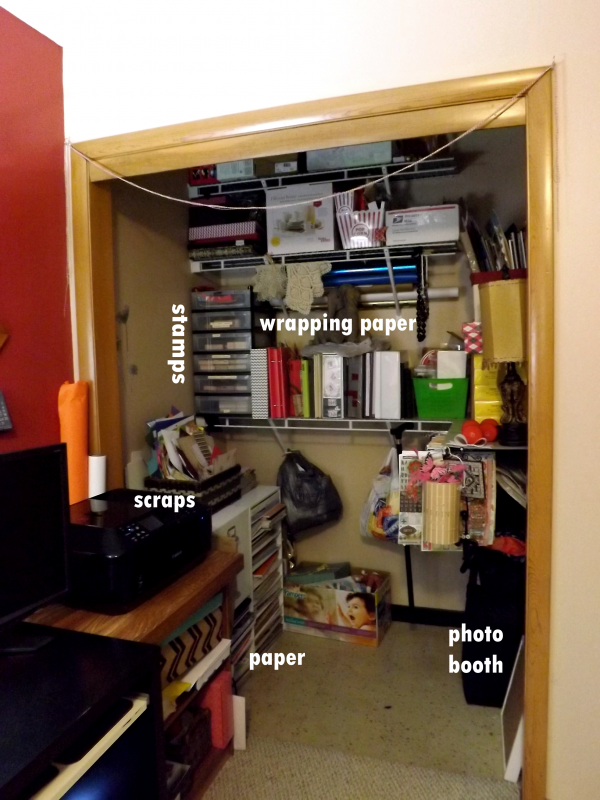
I really like the way the closet turned out. Three of the shelves I got for $33 total somehow on Amazon. I don't have any idea how it got marked down so low, but I'm not asking questions! I've had the three shelves up for quite a while; Adam helped me put them up a year or so ago. If you remember, we had a hard enough time figuring out how to put THOSE dang things up - so forget about us doing any real type of construction! After we put those up, I thought it would be a great idea to get another shelf to go along the side of the other, so I bought one. And that's all she wrote.
lol... I finally caved in over the weekend with Lisa and we put it up. It was much easier this time around. Plus, this shelf was a different brand than the others, and the instructions were 29,466 times easier than the other's. It's funny that the shelf fits *perfectly* alongside the others. That means I have to buy two more to go alongside the others!
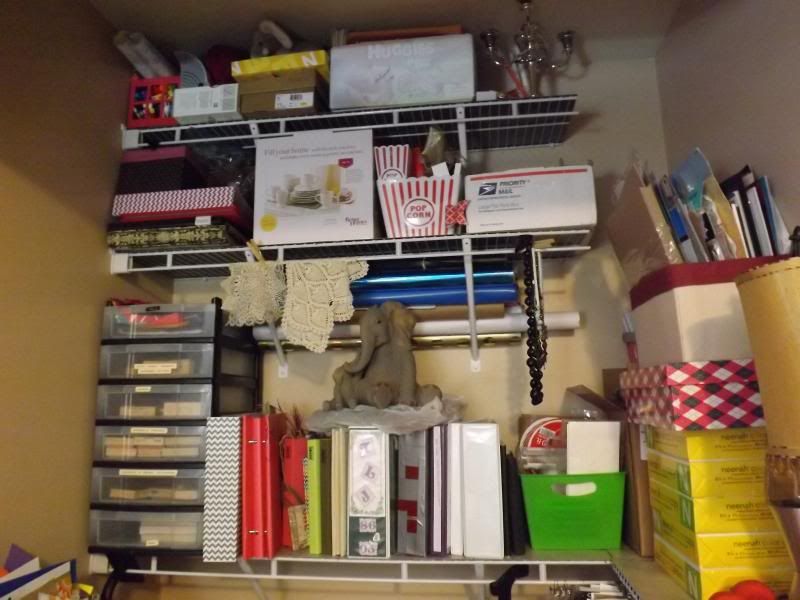 |
The organized mess in the closet. If I had all white containers instead of mixed colors,
YOU KNOW you would say "Ahh! So organized!" |
This closet was awful, as are all of them in this house. It just had a single shelf, which was as deep as this closet. This should've been a walk-in closet to begin with! I took out the shelf by just a little push of the hand (literally), and made it into the workstation.
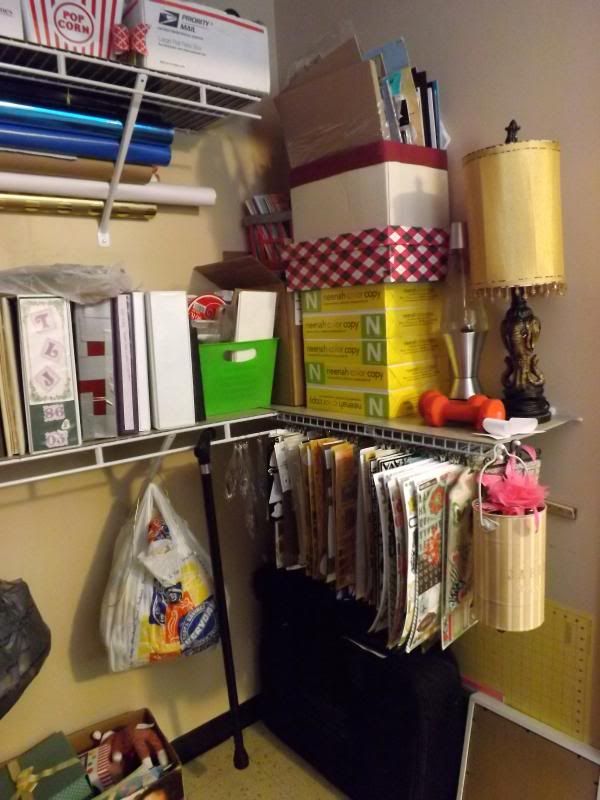 |
| Neenah cardstock stash. |
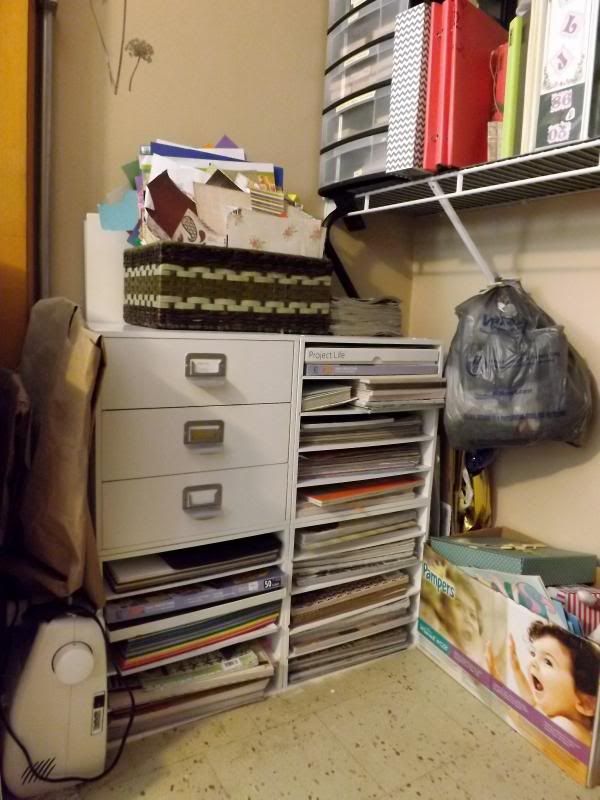 |
Stacking cubes to store paper from Hobby Lobby.
|
SMALL ITEMS:
|
|
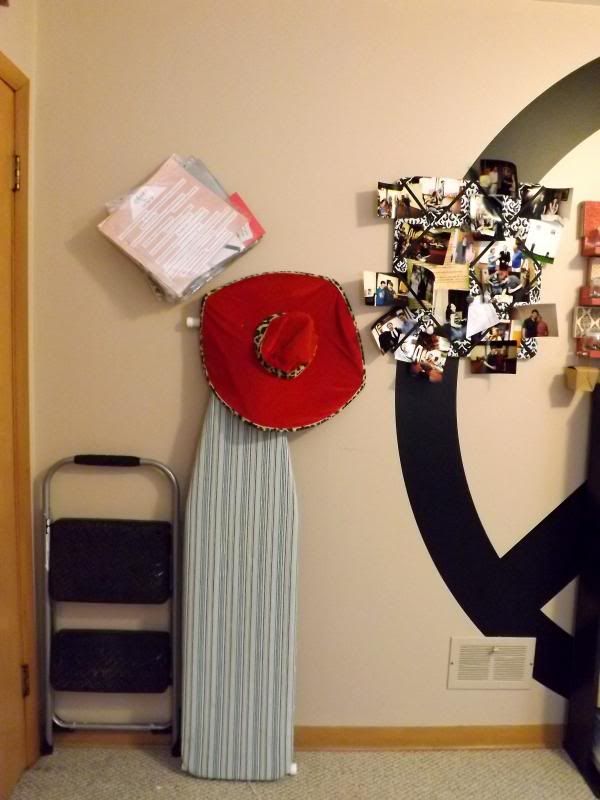
Yes, that is a pimp hat. I found it at a thrift store!
|
Behind the door is my step ladder and ironing board.
I plan to replace the ironing board with this one. I need my step ladder handy because I am short and I always need things off of the shelves in the closet.
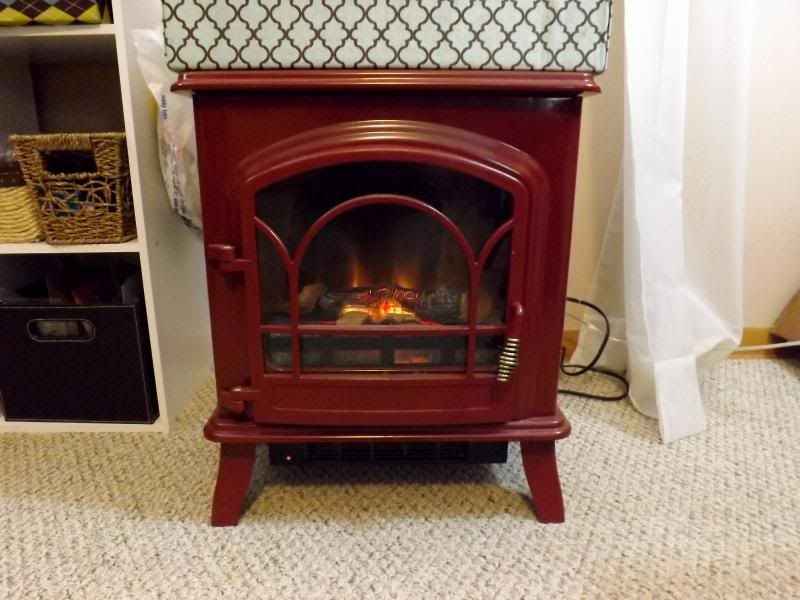 |
| "Antique" stove. |
The best thing about the room, over and above pretty much
everything else, is my space heater! It’s a cute faux stove oven with a corny
fake fire. Adam got it for me a few Christmases ago because it’s always
FREEZING in the Craftination Station! Love it.
|
|
Loose ribbon held together with a clothespin.
|
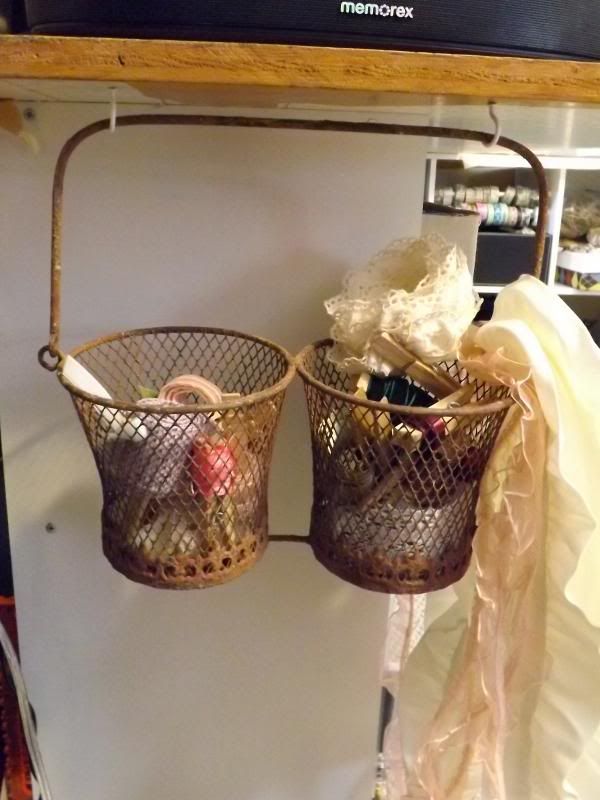
I fell in love with the hanging baskets on clearance at Hobby Lobby. I hadn't found a use for it until this weekend, when I found I could wrap loose ribbon and secure it with a clothespin. The white and pink ribbon on the side are trims that will be going on a box one of these days.
|
|
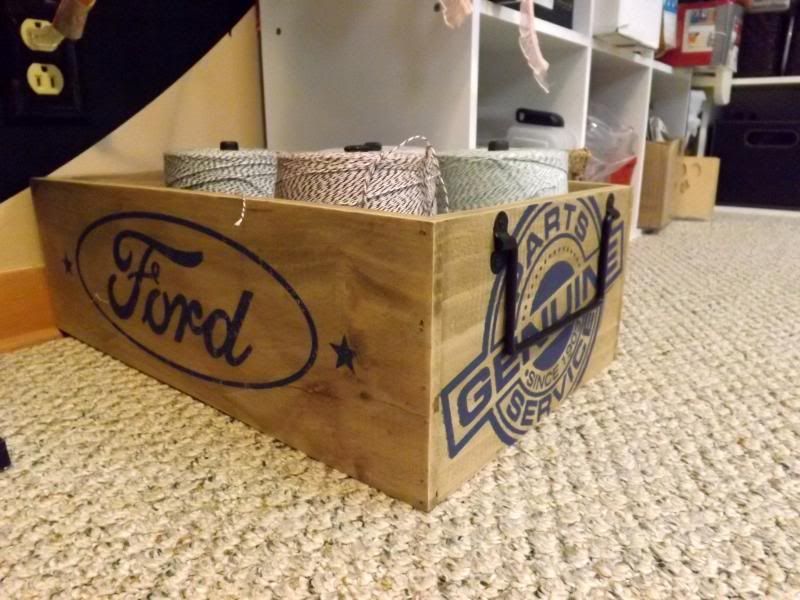
Crate from Hobby Lobby. I spent way too much on this thing, and it even was 50% off...
|
I purchased the Ford box that holds my twine at Hobby Lobby. Even though it sounds CRAZY, I spent about $65 on the five spools of twine when I first started my stash about three years ago. I figured $65 for a billion yards was better than spending $5 for 20 yards in the ribbon section in Hobby Lobby for the same thing. Even though it costs more in bulk, I'm pretty sure I’ve saved tons by spending a lot up front!
|
|
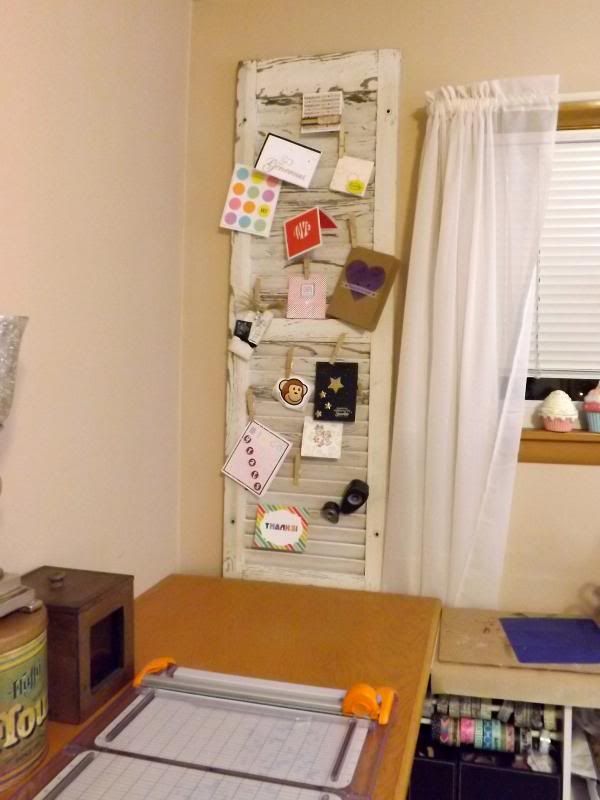
Shutter picked up from the side of the road.
|
This shutter is cool. I didn't do anything to it except spray it down with a hose.
|
|
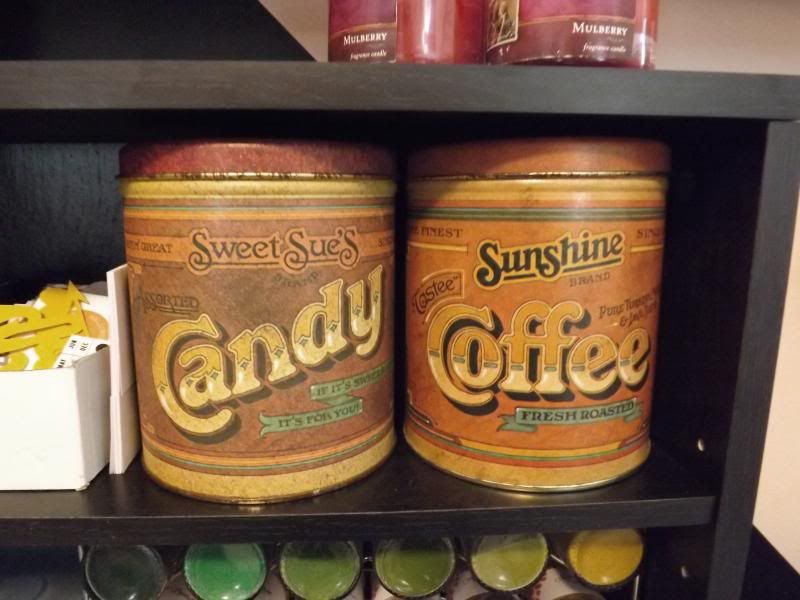
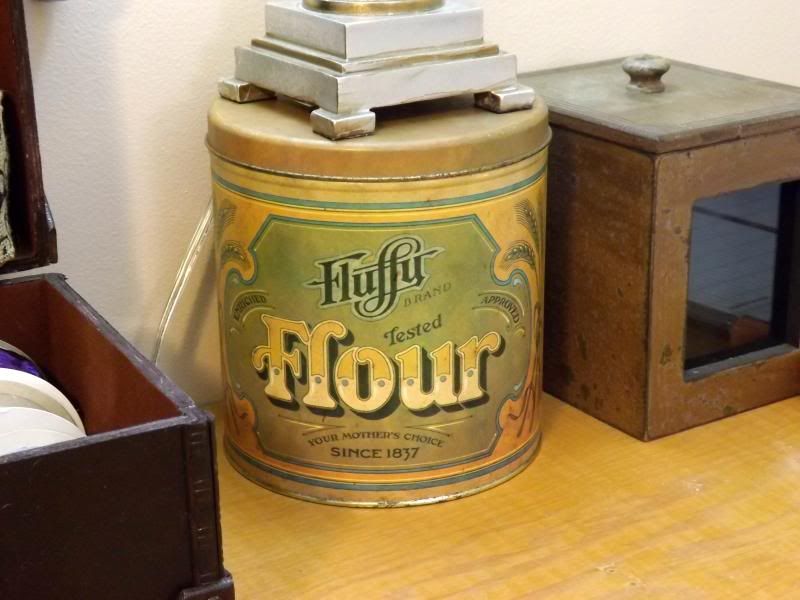
Antique tin can from the 70s.
|
I got these antique tins at a thrift store for about a buck each. LOVE em!
|
|
Antique tin can from the 70s.
|
|
|
Antique tin can from the 70s.
|
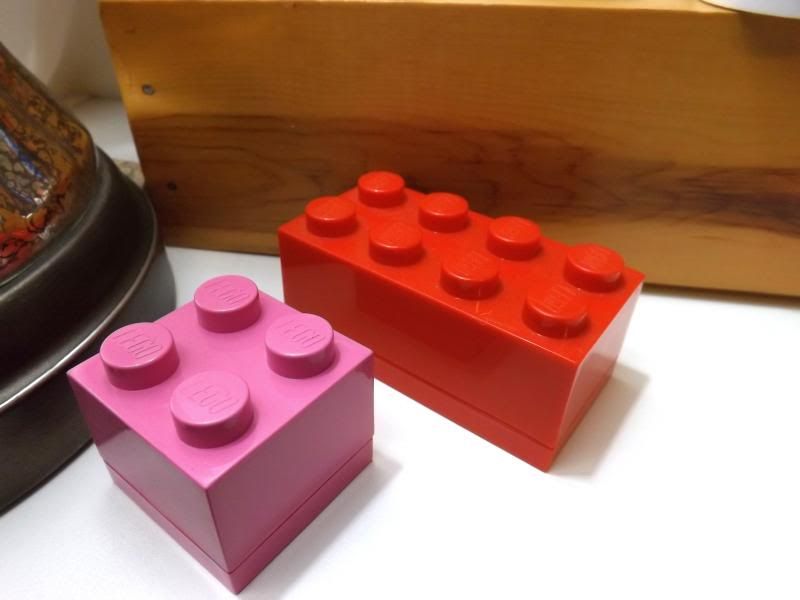
Although a lot smaller than what I thought when I purchased them, it turns out these Lego Boxes are the perfect size for paper clips.
FRUGAL:
As you can see, there a few ugly, brown shipping boxes. Little do you know, little bunny, that just a piece of
fabric makes this ugly duckling into a beautiful swan.
You can see half of my boxes that I have are covered with beautiful fabric! I purchased about
20 (read: too many) boxes before I found tutorials via Pinterest and went on a
boxing spree. I made 21 and two halves boxes (two still don’t have liners) in
just a few weeks. I am ever so grateful to my mother for teaching me what she did about sewing because I have to sew the liners. I have about 15 more boxes all ready to be covered and then I just
have to get something to put in them, which naturally will only come with time.
Read more about the start of my adventure here.
The purple chair is just a kitchen table chair that I got
for free off the side of the road. It fits my large butt, so it works
perfectly!
The desk my husband helped me put together wasn’t much… the
wood slab and legs was apparently $38, after going back and figuring it out.
Read more about it here.
I already talked about them, but the microwave table and the workstation tabletop were free! I love free.
JUST PLAIN NIFTY:
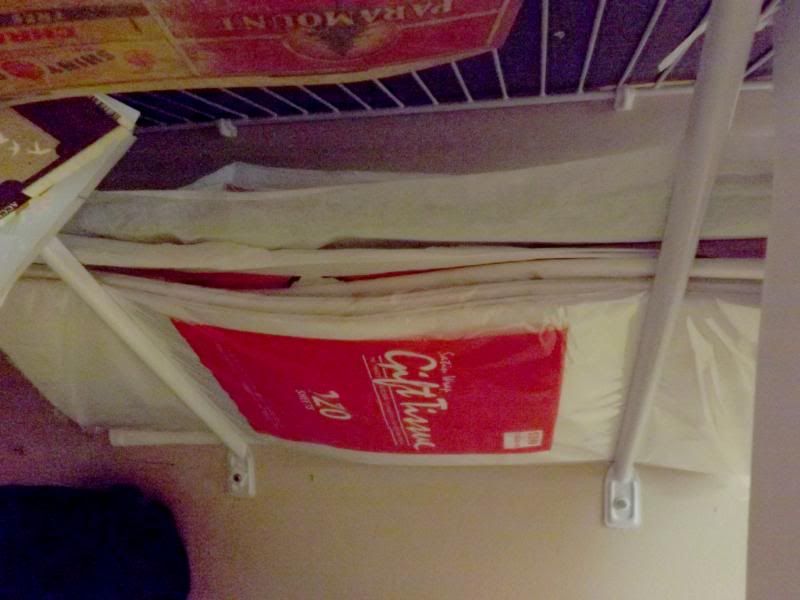
There are a lot of solutions online for organizing wrapping paper. They're just so big and awkward, you really have to be creative and work with what you've got. My mother has a really short, long plastic tote that fits perfectly under the bed that she puts hers in. Works great. I do have one of those, but it has other things in it. Before we put the shelves up last year, I had two bike racks installed in there that held the paper, and it worked beautifully (
as similarly seen here). It would've been fine, had I put the rack back up after that, but I didn't. I'm lazy. However, with the new shelves added, there wasn't room for the bike rack! Did you see what I did with them in the big-shot picture of the closet?
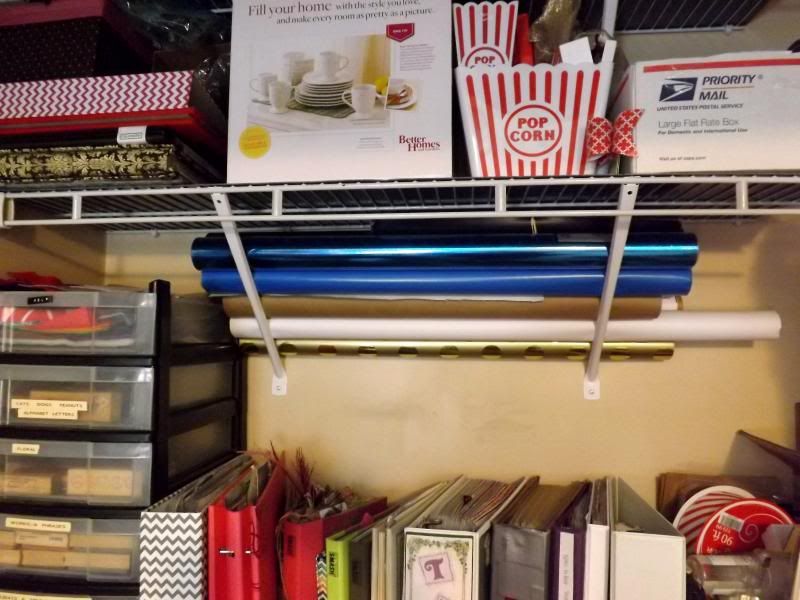 |
| BAM. |
BAM! I haven't seen this solution anywhere! Lisa and I awed out loud - it's such a cool idea, don't you think?
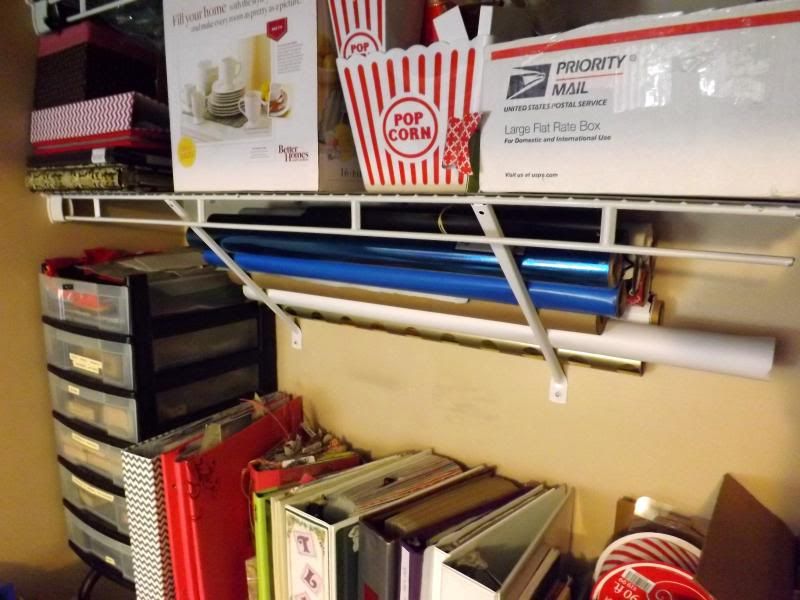 |
| From above. Can you see it better? |
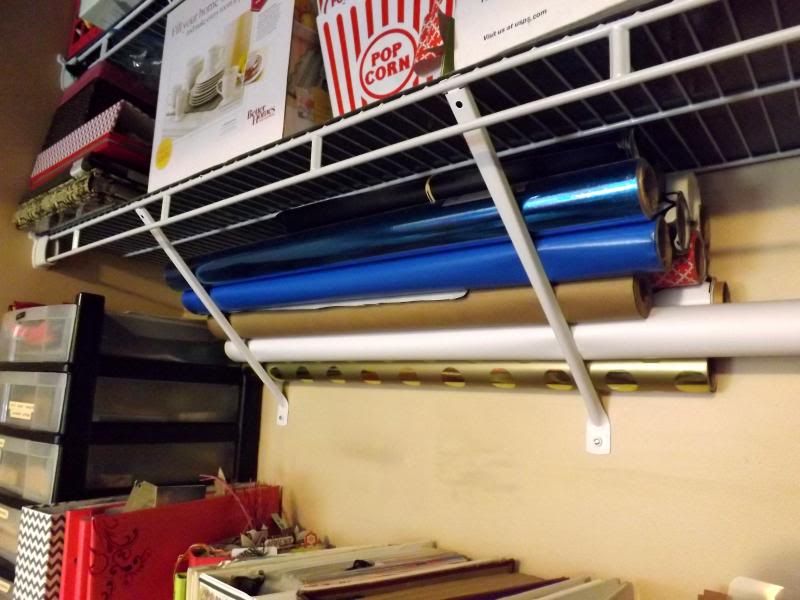 |
| Since I have two more shelves, I can buy more wrapping paper now! ;) |
 |
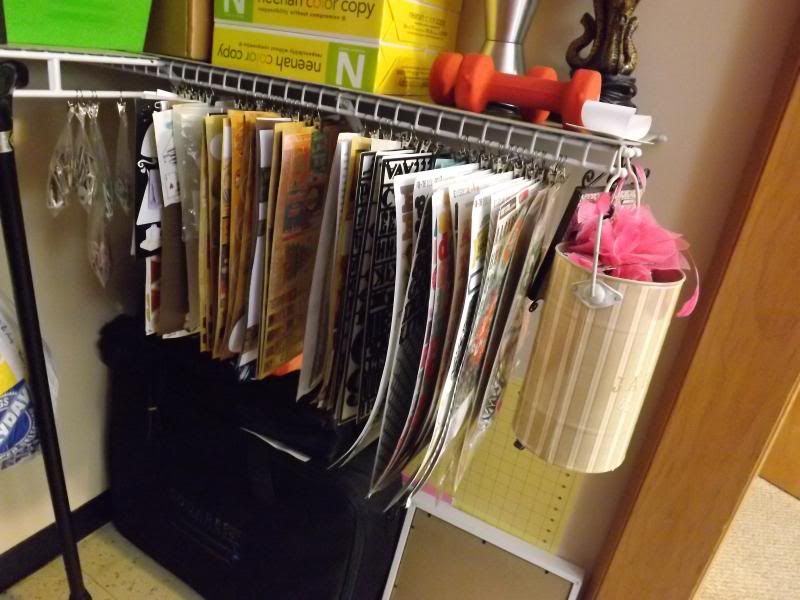
Solution for tissue paper as well!
|
I have my 205 different types of tissue paper under the new shelf in the same fashion.
 |
| Stickers. |
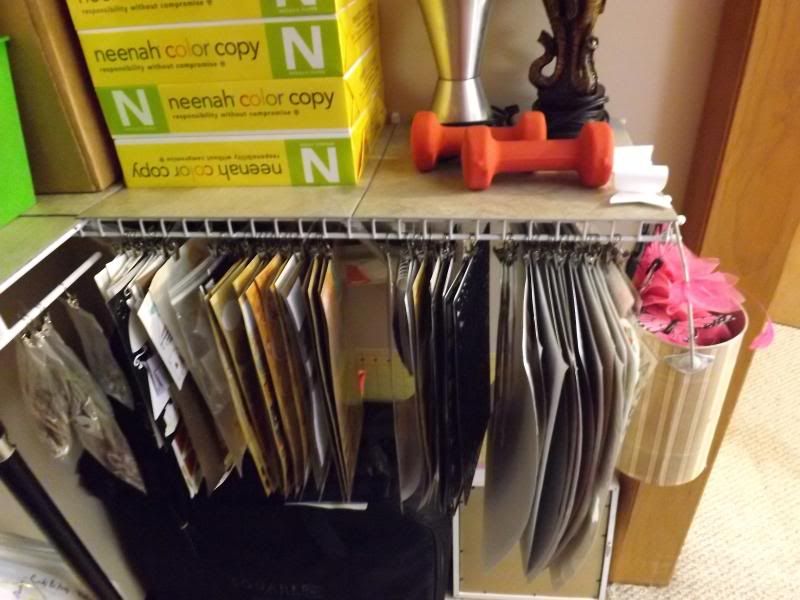
Have you heard of the Clip It Up organizer by Simply Renee? It's a pretty cool concept, and
you can read about it here. I bought one when I thought I was getting a great deal on it ($45), right before the item was discontinued. I REALLY wanted the wall unit, but it was already discontinued and I could not find a used one anywhere. Now I'm really glad I couldn't find one. Once I got it, I clipped up everything that I ever had, found things that I completely forgot I had, and then was really surprised at how much room it took up. For some reason I just didn't realize how much room it would actually take up. Over the weekend, I asked Lisa if she could think of a solution to replace that. She didn't, but I did. On the new shelf in my closet, I was trying to utilize all of the new space, and wanted to hang something from the railing. *DING DING*! I tried one of the hooks, and BAM. I tried it on the other shelves (remember, a different brand), and the hooks didn't quite fit. What a happy coincidence! I am super excited about this organization solution. Now I'm trying to get rid of the base unit. Anyone interested? :)
 |
| "Clip It Up" Tessa-Style. |
THERE WERE A FEW SPLURGES...
The jars for the shelves.
Those are pricey, but I wanted something that looked really
nice and I didn't want to have to re-purchase anything. I didn't care so much
about uniformity, as I never do, but these just fit the bill.
The ink column spinny thing.
I was having a heck of a time keeping my regularly used inks
together, in front of me, and organized. To me, this was an investment and
worth every penny.
The white Closetmaid organizers.
To me, these were splurges because they ended up being
expensive when added all up together. I don't know what brand people normally
get, or how they get their husbands to build them these monstrosities. My
husband (admittedly) isn't very handy.
The workstation cubes were from Walmart and were about $45. The shoe racks on top of the table were about like $13 at Lowes, however
the shoe organizer below the table was free. The four modular units in the
closet were from Hobby Lobby with a 40% off coupon, and even with that they
seemed expensive... $24 each! That's a total of about $165 on storage ALONE.
Sheesh.
What's worse is that those modular paper units are kind of falling
apart. One shelf already has started - it won't hold one of the shelves
anymore. Also, as you can see, the units on top of the desk are bowing from the
"weight". That stuff weighs hardly anything. It's like it can't even
hold gravity.
I wouldn't consider purchasing the media shelves as
splurging. They were about $20 at Walmart. I guess that adds up to the storage costs... so that makes it a little over $200 on storage.
I don't count my laptop, desktop or printer. That's stuff I
would have if I was crafting or not. If I were to count them, then I would
definitely say I went over budget :)
To sum up, I would like to share the progression frames from the last three years:
I told you this was going to be a long post. HUGE. Now that I have these pictures up, I don't have to post such detailed photos about what's around me. I can just refer back to this post!
Comment and let me know what you think of my "eclectic" room!



.png)