GUYS.
I. Am. SO. Excited!
I feel like one of those chicas on
Crafty Storage with their fancy organizing getups that makes me drool and burn with envy. Only I am SO much cooler because I made my stuff for like... TWO DOLLARS. Heck to the yes.
Since we moved in over a year ago, I've slowly been transforming our spare bedroom into my scrapbooking oasis. I
painted the walls from eye-gouging green and I
purchased furniture. I've also slowly been adding to my collection of supplies. With those supplies, I found a need for a certain kind of storage. I like embellishments. Ok, I
love embellishments. I started accumulating so many that I could never find what I wanted when I wanted it. I didn't have any great way of organizing anything other than large items.
Enter: Pinterest. I found loads of inspiration and ideas. One particular photo I could not get out of my head.
This lady has an entire house dedicated to scrapbooking. It's more like a cottage, but still... /jealous. She says these tiny shelves are picture rails. I don't know where she lives or where she purchased them from, but I couldn't find any picture rails that looked like that. When Erin came to visit me for my birthday, I showed her this picture and asked if she could help me try to find a picture rail or something similar at a local store. Finding something cheap was key. We walked around for over an hour and found a lot of things that could work. Some picture rails would probably work, but they weren't much of a shelf at less than an inch deep. I could just purchase shelves at $40 a pop for a mere 24 inches. I could install an entire wire shelving unit. Or I could build the dang things myself. We were going to buy regular, nice, expensive planks of wood, until Erin found the stash of "utility wood" for 20-40 cents a board.
I could hear the heavens sing.
We picked up wood screws, Erin bought me drill bits, and Adam picked up a cheap drill for $20 that would do the trick. Essentially, yes, they were more than $2.00, but we'll be using the drill for more than just this project, and the screws were super cheap.
When we got home, Erin immediately made the shelves. I just helped her hold the boards together.
Once the glue dried overnight, I sanded for what seemed like forever. This utility wood definitely was not 40 cents because it was beautiful.
Once I was sick of sanding, I primed them, sanded again, then used leftover paint red paint. After 3 coats and over a month later, they were finally finished. Adam helped me put them up last night!
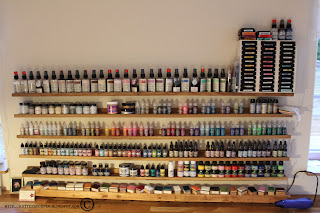
Once they were up, I threw my supplies up there in no time.
Over the past several months I had been saving up and splurging on these Libby spice jars ($20 for 12 jars) to store my embellies. They fit on the shelves perfectly!
Once the jars were up, I realized they could also help me easily see my wood mounted stamps, distress stains, inks and reinkers, too!
I am SO happy with the way these turned out. Not only are they EXACTLY what I wanted, but they were cheaper than any other solution short of getting them for free!


